The H505 error code belongs to a collection of errors that normally arise when customers are trying to get entry to a company file that isn’t always positioned on their pc but it may also arise if they’re gaining access to a file on their pc with unsuitable configuration. QuickBooks Expert team.
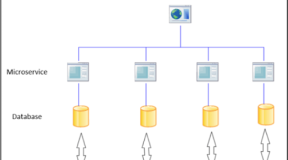
Numerous error codes share comparable solutions to this one and customers have pronounced that the mistake commonly occurs in multi-user surroundings and it virtually makes the communique among several related devices or bills greater hard in terms of sharing an unmarried organization record.
The instructions under need to show to be helpful to folks who are experiencing this mistake code. There are pretty a few solutions displayed so make sure you comply with them separately till one of them manages to solve your hassle. Read more Error 3371.
Answer 1: affirm the hosting system
When you consider that this error regularly occurs inside the multi-consumer surroundings in which one computer (the server) serves as a bunch, you simply want to ensure that handiest one pc has the hosting choice enabled by using following the stairs beneath for each pc or computer associated with the task except for the hosting computer.
Open QuickBooks by means of double-clicking its icon and navigate to record >> Utilities.
You must be able to see the Host Multi-consumer access choice on the listing which seems which means that this laptop isn’t web hosting the corporation report and it’s secure to move on to the subsequent pc. Ensure you don’t trade something if you see this selection.
If you click on report >> Utilities and also you see the forestall web hosting Multi-person get right of entry to click on on this selection so one can prevent this computer from being the host, leaving only the host computer.
Repeat this method for all computer systems except for the real host.
Answer 2: test to peer if the right services are strolling
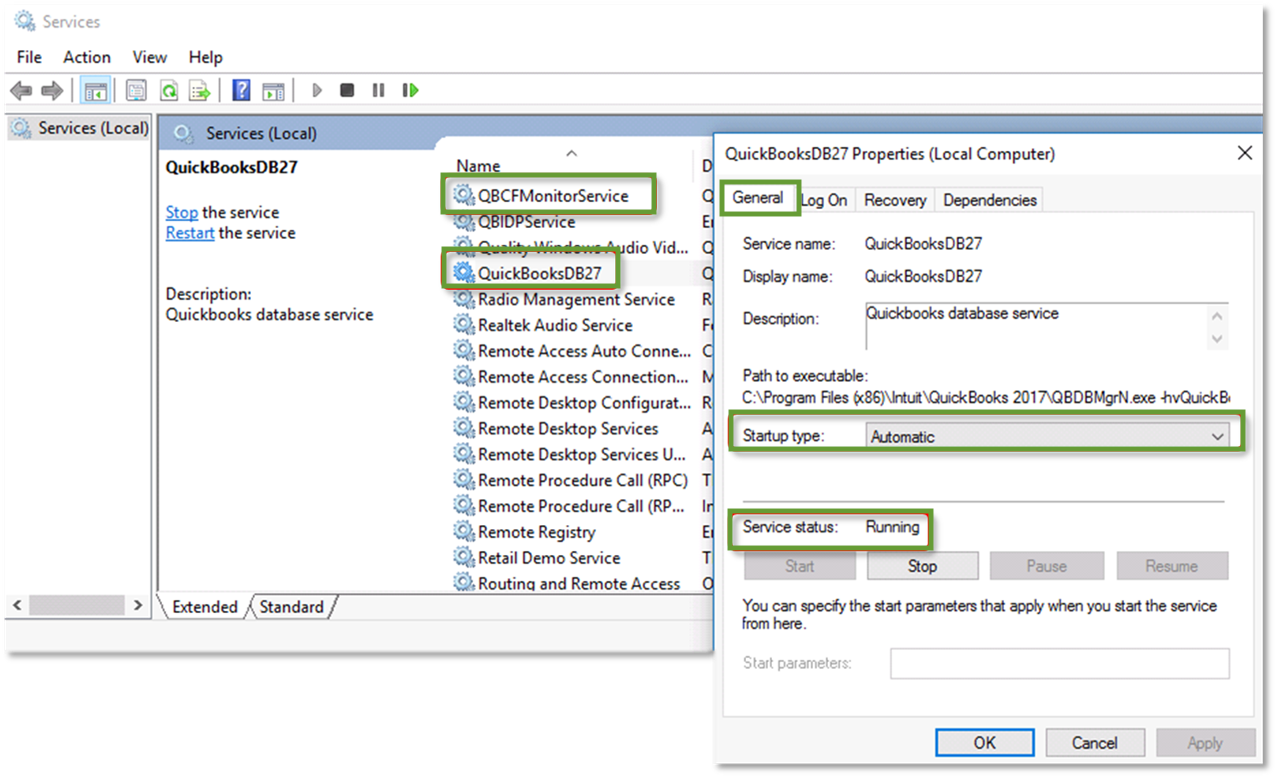
This answer and the settings underneath which want to be tweaked are related to the server laptop or the host which needs to have the option displayed in answer 1 enabled. There are a couple of offerings that need to be jogging at all times on the server computer (QuickbooksDB and QBCFMonitorService) so allow’s ensure they’re.
If you are the use of a model of home windows older than home windows 10, the very best way so as to access the offerings strolling to your pc is by way of clicking on the begin button and navigating to the Run conversation box.
If you are using Windows 10, you may also get admission to services by using the Ctrl + Shift + Esc key mixture so as to convey the task manager.
After you have correctly open offerings, observe the instructions below.
Discover the QuickbooksDB by using clicking on the name column so that you can sort the services in alphabetical order.
Proper-click on at the provider and click on houses.
- Navigate to the Startup kind and set it to computerized however make certain it’s carrier popularity is walking or began.
- If the status says Stopped you’ll need to click at the begin button placed in the homes window earlier than proceeding.
- Next, click at the healing tab, find the primary failure option and pick to Restart the service. Do the same for 2d Failure and subsequent disasters.
- The provider must start now and also you gained it have any problems dealing with it in the destiny. But, you could receive the subsequent error message whilst you click on begin:
“windows could not begin the QuickbooksDBXX service on a nearby laptop. Mistakes 1079: The account special for this carrier differs from the account exact for different offerings jogging within the equal technique.”
If this happens, comply with the commands beneath to repair it.
Observe steps 1-4 from the commands under with the intention to open carrier’s houses.
Navigate to the go browsing tab and click on on the Browser… button.
Seasoned TIP: If the problem is along with your laptop or a computer/pocketbook you have to strive the usage of Reimage Plus that could experiment with the repositories and replace corrupt and missing files. This works in maximum instances, wherein the issue is originated because of system corruption. You can download Reimage by means of Clicking right here
- Under the “enter the object name to pick out” field, kind for your PC’s name and click on take a look at Names and look ahead to the name to end up authenticated.
- Click on adequate when you are finished and sort in the administrator password within the Password box whilst you are brought about with it.
- Click adequate and close this window.
- Navigate returned to QuickbooksDBXX’ residences and click start.
- Close everything and take a look at to look if the provider is jogging. Repeat the technique for the QBCFMonitorService.
Answer 3: Open the Network Ports QuickBooks makes use of to Transmit information
Firewalls can prevent QuickBooks from having access to the net properly and that is a principal difficulty. Exclusive firewalls may be established on your pc however it’s no longer endorsed to use a couple of. Permits ensure QuickBooks files are not blocked via the home windows Firewall and that we open ports being utilized by the software.
Navigate to the govern Panel by looking for it inside the begin menu and click on system and security >> Home windows Firewall. You could also transfer the view to huge or Small icons and click on the home windows Firewall right away.
- Pick the superior settings options and spotlight Inbound guidelines in the left phase of the screen.
- Proper-click on Inbound guidelines and click on New Rule. Under the rule kind section, select Port. Pick out TCP from the primary set of radio buttons (TCP is usually recommended) and transfer the second radio button to “particular local ports. You may need to add the subsequent ports so that it will fix QuickBooks updating capability:
- QuickBooks computing device 2018: 8019, 56728, 55378-55382
- QuickBooks desktop 2017: 8019, 56727, 55373-55377
- QuickBooks desktop 2016: 8019, 56726, 55368-55372
- QuickBooks computer 2015: 8019, 56725, 55363-55367
- Make certain you separate them by using a coma right to the final one and click on next after you have finished.
- Choose the permit the relationship radio button within the next window and click next.
Choose the community type whilst you need to use this rule. If you turn from one community connection to every other quite frequently, it’s endorsed which you maintain all the alternatives checked earlier than clicking subsequent.
Call the rule of thumb something which makes sense to you and click finish.
Make certain you repeat the equal steps for Outbound rules (pick out Outbound policies in Step 2).
Answer 4: editing the Host file on home windows
Every now and then it is necessary to edit the Windows hosts file and add your net server there so that you can upload this server to the whitelist. That is a particularly advanced procedure and also you must always make certain you follow the commands carefully. You will need to have an Administrator get admission to so that you can proceed to ensure you log in with your administrator account.
On the server, use the Windows Key + R key mixture to open the Run dialog container.
Kind “cmd” and press enter to open the Command spark off the window.
Kind “ipconfig /all” (there is a space after ipconfig) and press input to run this command
Pay attention to the Hostname (computer name) and the IP deal with (it will both be the IP address or IP deal with v4). Ensure you repeat the technique for all workstations and computers connect within the multi-consumer environment. Write this data on a chunk of paper or store it in a text file.
The next issue we want to do is to without a doubt edit the home windows Hosts report.
Close QuickBooks and navigate to begin Menu >> This computer. Make certain you navigate to the subsequent cope with:
C: WindowsSystem32DriversEtc OR
C: WindowsSyswow64DriversEtc.
Notice: in case you are not able to see the windows folder in this computer >> Local Disk C, you may need to make certain you’re able to view the hidden documents and folders by means of following the steps below:
Click on the “View” tab on File Explorer’s menu and click on the “Hidden gadgets” checkbox in the display/conceal phase. File Explorer will show the hidden documents and will consider this feature until you change it once more.
Proper-click on at the Hosts report within the folder pick out Open with… and open the file with Notepad.
Enter the IP cope with and kind within the computer call (Server- may have notebook IP and the pc name. Laptop- will have Server IP and pc name). Whilst getting into these facts, use the Tab key in place of the distance bar to split the IP deal with and the pc name.
After you finish, you can practice the modifications and reopen QuickBooks in multi-person mode.