
Consider the User Query –
“I need to import some of my old emails from Windows Live Mail to Office 365. I searched over the internet but, did not found any proficient method for the same. I tried a third-party applications, then, I realized that I have wasted my money. So, now please suggest me an appropriate approach to convert Windows Live Mail emails to Office 365 instantly. Thanks a lot.”
These days, most of the users are looking for an appropriate solution to migrate Windows Live Mail to Office 365. Users wants to migrate from Windows Live Mail to Office 365 due to its advanced features and functionalities. But, the user cannot easily import emails data of WLM into O365. So In this guide we are going to explain two methods to convert Windows Live Mail to Office 365.
How to Migrate Windows Live Mail to Office 365 Account?
Method 1 – Manual way
There is no availability of one step manual solution to export Windows mail to Office 365 easily. Mainly, this manual procedure is divided into two partitions as follows:
- Convert Windows Live Mail emails to PST File
- Import the Outcome PST File Into Office 365 User Account
To implement the migration process simply, follow below-outlined steps in a sequential manner:
Step #1: Convert Windows Live Mail Emails to PST File
- First of all, start the both Windows Live Mail and Outlook email applications simultaneously
- Then, in the main screen of Windows Live Mail click on File tab, after that select, an export option and then under export select the email messages option.
- Here, select the Microsoft Exchange and then hit on the Next button
- Now, a dialog appears to your screen that says Export Message
- Just click on OK button to proceed forward
- Subsequently, select all the preferred folders or all the folders to proceed. Afterward, click on OK button
- Here, the procedure for exporting WLM data to PST is started properly.
- After completion of the export process, a message prompt up to your screen that says Export Complete.
- Lastly, hit on Finish button to end up the export procedure successfully.
Note: Above procedure, we explain steps to convert Windows Live Mail emails (EML) to PST file this method will work when Windows Live Mail is properly installed in your system. If you don’t have Windows Live Mail installed on your systems, but you have WLM emails then you need to use Windows Live Mail to PST converter to perform conversion of EML to PST.
Step #2: Import the Outcome PST File Into Office 365 User Account
With the help of network upload method, a user can implement the migration process from PST to Office 365 easily. Mainly, this allows a user or an admin to upload the Outlook PST files above the network. After that, all PST files are been stored into O365 account using MS Office 365 Import service. Therefore, a user must have to download the Azure AzCopy software free utility that will permit to copy PST file to Office 365 account. To do so, we discussed some steps in the upcoming segment. Follow all the steps to perform the migration task:
- Initially, copy SAS URL & Download Azure Azcopy
- Then, transfer the Converted PST file to Office 365 account
- After that, review the report of uploaded PST data files
- Here, you have to generate a PST import mapping file. To do so, follow the below-listed steps:
- First of all, load a copy of the PST Import mapping file i.e., CSV file
- Now, populate the CSV data file with the required information
- Create Import Job in MS Office 365
-
- Primarily, navigate to Import Data page and add the settings as shown in the below-listed image.
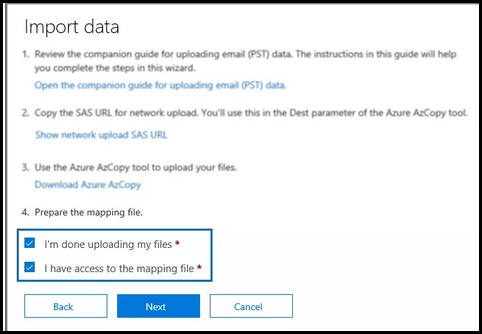
- Now, you have to choose Next after that, upload the CSV file which was created previously using an option to Select the mapping file.
- Subsequently, click on Finish. Here, the job is noted on the page such as Import data to Exchange Online.
- Finally, choose Refresh and then update the status. If in case, the analysis is already completed. Then, the status is automatically changed to Analysis completed.
-
Import PST to Office 365 Professionally
This manual way to import PST to Office 365 using network upload is very time-consuming. If you do not want to waste your time then, you should have to opt automated tool to perform PST migration to Office 365 account.
Methods 2 – Direct Way to Export Windows Live Mail to Office 365
The above-listed manual way to migrate windows live mail to Office 365 explained here, in this post are having some limitations. So, you should have to go with one way solution named as EML to Office 365 migration tool. This is one the best software to import Windows Live Mail emails to Office 365. Mainly, this software is programmed with advanced features which facilitate a secure export procedure without losing a bit data. Additionally, this tool does not associate with any kind of compatibility issue. Thus, it supports all versions of Windows OS effectively. Ultimately, the preference is totally yours, which one you need to choose.
Final Verdict
Migrate Windows Live Mail to Office 365 is not that much tough procedure but, the manual methods having some constraints such as it is the time-consuming and hectic process for a novice user etc. So, it is highly recommended to go with professional technique i.e., EML to Office 365 migration tool. Moreover, you can go with any of them, the choice is yours.